Birthday Cake!
"I don't want to have my school birthday tomorrow. I'm not going."
"Oh dear. That's really too bad. BECAUSE I'M BAKING TWO CAKES FOR IT TONIGHT AND DAD AND I ARE GOING."
As you may know, Wyatt turned FIVE this week. And on Sunday evening, he announced his non-attendance at school on Monday just as Marc whisked him, freshly showered, off to bed after a truly epic weekend of fun (and an equally epic melt-down at the end of it all). And, to be honest, two hours later, between baking the first and second cake, I marched down the hall to announce (again) to Marc, "I HATE BAKING." Wyatt and I probably both meant to declare instead, "I'M EXHAUSTED."
Part of turning five in Wyatt's kindergarten is having a little celebration in the classroom: A birthday circle, with cake. There are two children's birthdays this week, so that's why we needed two cakes. Wyatt's class has celebrated most of the children's birthdays already. The tradition (as I understand it) is that the family of the birthday child provides the ingredients that a teacher then bakes into a birthday cake. I've seen the cakes—glorious looking bundt cakes topped with a sprinkle of powdered sugar and surrounded by a crown of fresh fruit or flowers. Because Wyatt is gluten-free, he can't have the school birthday cakes, so I bake gluten-free cupcakes that the teachers keep in the freezer for him and defrost as needed. Wyatt doesn't mind missing-out on the birthday cake. The cupcakes I bake for him are really good, and the fact that most baked goods are "gluten" instead of "gluten-free" is something he's used to.
But let's be honest. There's something special about being able to share a cake with all your friends on your birthday. In Wyatt's class, there are a couple of children who are gluten-free, and one child who is also dairy-free. So far, it hasn't been possible for the whole class to share a cake. Or two cakes, for that matter.
I figured it was time to find a cake recipe that everyone in his class could enjoy. Over the last two weeks, I have baked (and shared) a BUNCH of yellow 6-cup sized bundt cakes. I'm no baker (never mind a cake baker, as evidenced by the fact that I borrowed cake pans for this project), but thanks to a little knowledge from my Science & Cooking class and some careful troubleshooting, I have arrived at a delicious cake recipe that is gluten-free, dairy-free, and comes out of a bundt pan with absolutely no difficulty. The structure of the cake is very good and the crumb seems just right. This cake is a winner.
How much of a winner, you ask? Well, Wyatt told me when I picked him up from school, "Mom! We fooled the other gluten-free kids! They said to the teachers, 'Why did you give me cake? I can't have cake.' But they could! They were SO HAPPY and ate it all up. We even got seconds! Let's fool them again next year." My heart melts a little every time I think about how "we fooled them," and I feel a twinge of regret for all the times I declared, dripping spatula raised high in the air, "I HATE BAKING." An appreciative audience is one of the best reasons I can think of to bake a cake (or two).
Like most delicious birthday cakes, there's nothing health-food-like about this one. Also, because there aren't any children with nut or egg sensitivities in Wyatt's class, I only solved for gluten and dairy in this recipe. If anyone else wants to take on the challenge of further substitutions, please share in the comments the changes you make and how the cake turned out.
I developed my recipe based on the recipe for Yellow Cake in Gluten-Free Girl American Classics Reinvented and the recipe for Yellow Layer Cake in America's Test Kitchen's How Can It Be Gluten Free. I love both of these cookbooks. But having made both of these cake recipes in the past, I felt that that neither recipe would give me the exact cake I wanted (and both recipes include sour cream, anyway). So I did a little research about non-dairy sour cream alternatives, drew on the aspects I liked best about each cake recipe, tinkered with ingredients, and eventually, I got the cake I wanted.
As is the case with most "alternative baking" recipes, there are a few steps you need to take before actually baking the cake, so I'll lay those out first.
Make your Gluten-Free Flour Blend: I like Gluten Free Girl's blend, and that's what I used. You'll need 400 grams of millet flour, 300 grams of sweet rice flour, and 300 grams of potato starch. Combine all three ingredients in a large bowl and then whisk until well-blended. If you prefer, you can buy the blend, already mixed, here.
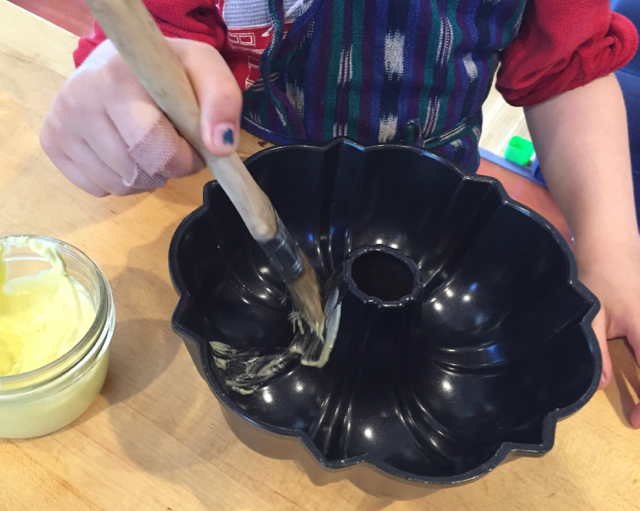
Make your Baking Goop: I had a terrible problem with my cakes sticking, and many good store-bought baking sprays include flour, which isn't an option when baking gluten-free. But this mixture works like a charm. Take equal volumes (I used 1/4 cup) of your gluten-free flour blend, a neutral-flavored oil, and shortening. Blend them (in a blender or with a whisk) until smooth. Store the mixture in a jar with a lid and refrigerate it when not in use to avoid separation. Before you bake, take the jar out of the refrigerator so that it can warm up a bit. Dip a pastry brush into the mixture and paint the goop evenly and thoroughly over the pan to prepare it before baking.
Make your Cashew Sour Cream: I mostly followed the recipe from Oh She Glows, but I used less water. Here is my slight adaptation of the recipe, which yields just under 2 cups of Cashew Sour Cream:
Ingredients:
- 1 1/2 cups (225 g) raw cashews, soaked
- 2/3 cup water
- 2 tablespoons fresh lemon juice
- 2 teaspoons apple cider vinegar
- Scant 1/2 teaspoon fine sea salt
Directions:
- Put the cashews in a bowl and cover them with boiling water. Soak for 1 hour, and then drain.
- Place the drained cashews in a high-speed blender (I used a Vitamix).
- Add the fresh lemon juice, vinegar, water, and salt. Blend the mixture on high speed until it is incredibly smooth.
- Store the "cream" in an air-tight container in the refrigerator. It will probably thicken a bit once it has chilled. You can store it in the refrigerator for about a week or freeze it for longer storage. I portion it in silicone ice cube trays before freezing.
... and then it's CAKE BAKING TIME! I used a 6-cup bundt pan (and to avoid over-filling the pan, I made a few cupcakes with the extra batter that didn't fit), but you could use another pan if you like. I prefer to weigh my ingredients when I bake because it is so much more accurate and yields the best results. But I have included rough volume measurements, in case you don't have access to a baking scale.
Gluten-Free, Dairy Free Yellow Birthday Cake
(click here for a printable version)
Ingredients:
- 100g coconut oil, melted (just under 1/2 cup)
- 311g Flour Blend (about 2 1/4 cups)
- 1 tablespoon gluten-free baking powder
- 1 teaspoon salt
- 1/4 teaspoon baking soda
- 4 large eggs, room temperature, separated
- a pinch of cream of tartar
- 198g granulated sugar (about 1 cup)
- 1 1/2 tablespoons vanilla extract
- 163g cashew sour cream (about 2/3 cup)
Directions:
- Place your baking rack in the middle position in your oven and preheat the oven to 325 degrees. With a pastry brush, paint your Baking Goop all over the inside of the pan(s) you will use. Brush a thin layer of goop thoroughly and evenly over the entire baking surface of the pan(s).
- In a small or medium-sized bowl, whisk flour blend, baking powder, salt, and baking soda until combined.
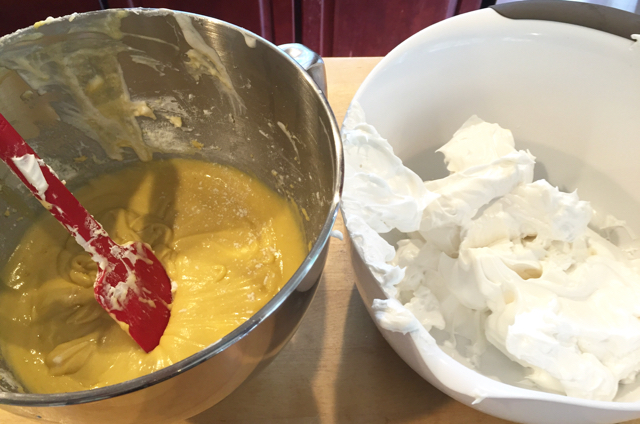
- Fit your stand mixer with the whisk attachment. Whip the egg whites and cream of tartar on medium-low speed until the mixture is foamy. It will take about a minute. Then, increase the speed to medium-high and whip the whites into billowy clouds for another minute. With the mixer running, gradually add half of the sugar and keep whipping the mixture until the whites make stiff, glossy peaks. It will take another two or three minutes. Transfer the mixture to a large bowl.
- Return your now empty mixer bowl to the stand mixer. Add the egg yolks and vanilla, and whip them for about 30 seconds on medium speed (until they are well-blended). With the mixer running, gradually add the rest of the sugar, and then increase the mixer speed to high. Keep whipping the mixture for another two minutes or so, until it becomes very thick and pale yellow. Reduce the mixer speed to medium, add the coconut oil, and then the cashew sour cream. Whip for another 30 seconds or so. Reduce the speed to low and gradually add the flour blend mixture. Mix until thoroughly combined (about a minute), scraping the bowl with a rubber spatula as needed.
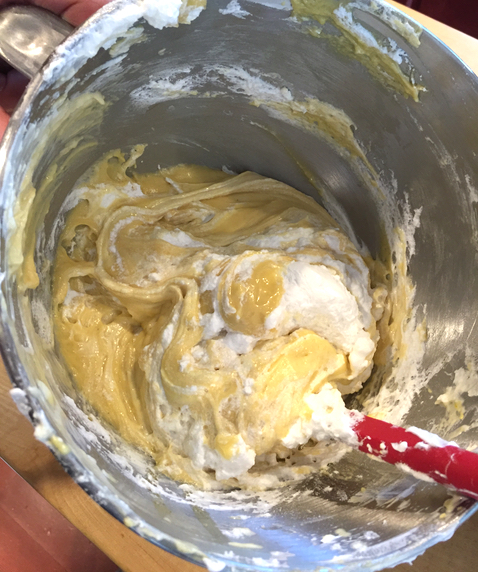
- Using a rubber spatula, stir one-third of the whipped egg whites into the batter you just made. Then, gently fold in the rest of the whites and keep folding the batter until you can't see any more white streaks in the batter.
- Pour the batter into your prepared pan(s), leaving at least 1 1/2 inches of space at the top of the pan. Rap the pan(s) sharply on the counter (to dislodge any bubbles that may have gotten trapped), and bake them. Rotate the pan 180 degrees half-way through baking time, and test for doneness by inserting a toothpick. Once the toothpick comes out clean, the cake is done. In my oven, the 6-cup bundt cake takes about 40 minutes. Cupcakes take about 25 minutes.
- Let the cake cool for 10 minutes in the pan, and then turn it onto a plate or platter. Let it cool completely before slicing and eating.


